Raspberry Pi Pico vs Pico 2 Pinout: What Changed and What Stayed the Same?
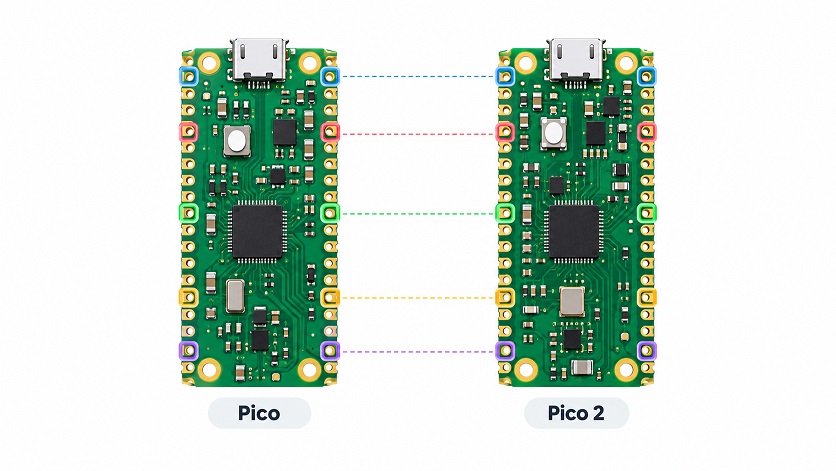
At first glance, the Raspberry Pi Pico and Raspberry Pi Pico 2 look almost identical. That is intentional. The original Pico uses the RP2040, while the Pico 2 replaces it with the much more capable RP2350. But...
At first glance, the Raspberry Pi Pico and Raspberry Pi Pico 2 look almost identical. That is intentional.
The original Pico uses the RP2040, while the Pico 2 replaces it with the much more capable RP2350. But Raspberry Pi kept the same 21 × 51 mm board format and, more importantly, the same main 40-pin layout.
So if you already have a circuit designed around a Raspberry Pi Pico, can you simply plug in a Pico 2?
In most cases, yes.
Raspberry Pi describes the Pico 2 as hardware-compatible with the original Pico, and its documentation states that the non-wireless Pico and Pico 2 use the same pinout and board layout.
But "same pinout" does not mean everything inside the chip behaves identically. There are several differences worth knowing before treating the Pico 2 as a completely interchangeable replacement.
Pico vs Pico 2 at a Glance
| Feature | Raspberry Pi Pico | Raspberry Pi Pico 2 |
|---|---|---|
| Microcontroller | RP2040 | RP2350 |
| CPU | Dual Cortex-M0+ | Dual Cortex-M33 or dual Hazard3 RISC-V |
| Maximum clock | 133 MHz | 150 MHz |
| SRAM | 264 KB | 520 KB |
| On-board flash | 2 MB | 4 MB |
| Exposed GPIO | 26 | 26 |
| Exposed ADC inputs | 3 | 3 |
| UART | 2 | 2 |
| SPI | 2 | 2 |
| I2C | 2 | 2 |
| PIO state machines | 8 | 12 |
| Main header layout | 40 pins | Same 40-pin layout |
The RP2350 therefore gives the Pico 2 considerably more processing capability without requiring Raspberry Pi to redesign the board around a different connector layout.
The 40-Pin Header Is Essentially the Same
For normal projects, this is the most important point.
Both boards expose the same 26 GPIO signals on the same physical header positions:
GP0 through GP22, followed by GP26, GP27 and GP28.
That means a device connected to GP4 on the original Pico can normally remain connected to GP4 when moving to Pico 2. The same applies to the other exposed GPIOs.
The power and control pins also occupy the same positions.
| Physical Pin | Function |
|---|---|
| 30 | RUN |
| 31 | GP26 / ADC0 |
| 32 | GP27 / ADC1 |
| 33 | AGND |
| 34 | GP28 / ADC2 |
| 35 | ADC_VREF |
| 36 | 3V3 |
| 37 | 3V3_EN |
| 38 | GND |
| 39 | VSYS |
| 40 | VBUS |
The arrangement of GPIO, ground and power pins therefore does not need to change when moving a typical breadboard or carrier-board design from Pico to Pico 2. Raspberry Pi explicitly designed Pico 2 to provide this drop-in experience.
ADC Pins Are Still GP26, GP27 and GP28
The three externally accessible ADC channels are also unchanged.
GP26 remains ADC0, GP27 remains ADC1, and GP28 remains ADC2.
This is useful for existing circuits containing potentiometers, analog sensors, joysticks and other devices connected to the Pico's ADC pins.
The presence of a more capable RP2350 does not suddenly turn every Pico 2 GPIO into an analog input. The Pico 2 still exposes three ADC-capable GPIOs through its standard 40-pin interface.
I2C, SPI and UART Wiring Can Usually Stay the Same
Both generations contain:
2 × I2C controllers
2 × SPI controllers
2 × UART controllers
The same GPIO numbering on the board means existing peripheral wiring can normally remain in place.
For example, if an RP2040 project uses GP4 and GP5 for I2C, moving the circuit to a Pico 2 does not require physically relocating those connections just because the microcontroller changed.
This is one of the major benefits of Pico 2's compatibility strategy: a carrier board, breadboard circuit or PCB designed around the original Pico can often accept Pico 2 without a board revision.
There are additional peripheral capabilities inside RP2350, however, so software that manipulates RP2040 peripheral registers directly should not automatically be assumed to be portable simply because the pins match.
One Important Electrical Difference: Pico 2 GPIO Can Tolerate 5 V
Here is one pin-related difference that is easy to miss.
The current RP2350 specification lists its GPIOs as 5 V-tolerant when powered. Raspberry Pi formally qualified this capability after the RP2350 launch.
That is different from the RP2040 used by the original Pico.
This does not mean the Pico 2 is a 5 V microcontroller. Its GPIO logic and supply system are still based around 3.3 V.
It means a digital input can tolerate a higher voltage under the conditions specified in the RP2350 datasheet.
There is an important catch: the 5 V tolerance applies when IOVDD is powered appropriately. Do not assume that applying 5 V to a GPIO on an unpowered Pico 2 is safe.
It also does not mean analog inputs should be treated like unrestricted 5 V ADC inputs.
For new designs, you should still check the electrical requirements of each signal rather than assuming "Pico 2 is 5 V safe" in every situation.
The Pico 2 Has More PIO Hardware
The original RP2040 contains two PIO blocks providing a total of eight PIO state machines.
RP2350 increases this to three PIO blocks and 12 state machines.
PIO is Raspberry Pi's programmable I/O system. It allows software-defined hardware interfaces to generate or capture precisely timed signals independently of the main processor.
The extra PIO block does not add more pins to the Pico 2 header. Instead, it gives software more resources for making use of the existing GPIO pins.
This is particularly useful for projects implementing unusual protocols, parallel buses, video signals, addressable LEDs or multiple timing-sensitive interfaces.
Pico 2 Is Faster, But That Does Not Change the Pin Numbers
The change from RP2040 to RP2350 is much larger internally than the nearly identical boards suggest.
RP2040 provides dual Cortex-M0+ processors running at up to 133 MHz with 264 KB of SRAM. RP2350 increases this to 520 KB of SRAM and can run dual Cortex-M33 processors at up to 150 MHz. It can also boot using its dual Hazard3 RISC-V cores instead.
Pico 2 also doubles the on-board flash from 2 MB to 4 MB.
None of those changes require different GPIO numbers.
That makes Pico 2 unusual compared with many microcontroller-board upgrades: the processing platform changed substantially while the connector interface remained intentionally familiar.
What About the SWD Debug Pins?
Both boards also provide the same three SWD signals:
SWDIO, GND and SWCLK.
These are separate from the main 40-pin interface.
On the standard non-header Pico and Pico 2 boards, the debug connection is located at the bottom edge of the board using three castellated through-hole pads.
Variants supplied with headers use a small keyed three-pin debug connector instead. Raspberry Pi's documentation confirms that the SWD signal set remains the same across Pico generations.
So a debug setup using SWCLK and SWDIO does not need to change simply because the target is now an RP2350.
A Note About Early RP2350 Chips
There is one GPIO-related issue worth knowing if you have an early Pico 2.
The original A2 stepping of RP2350 was affected by Erratum 9, a GPIO pad issue that could prevent a pin from entering a proper high-impedance state under some conditions.
Raspberry Pi introduced the newer A4 stepping in July 2025, which fixed the issue.
This does not change the Pico 2 pinout, but it can matter in circuits that depend heavily on high-impedance inputs or particular pull-down behavior.
For most current Pico 2 boards this should no longer be an issue, but it is useful to know when debugging older hardware.
Can You Replace a Pico With a Pico 2?
For most projects, yes.
If your project connects sensors, LEDs, displays, switches, UART devices, SPI peripherals or I2C devices through the standard Pico header, the physical wiring will generally remain the same.
The strongest compatibility points are straightforward: the 40-pin layout is unchanged, the 26 exposed GPIO positions remain the same, the three external ADC channels remain on GP26–GP28, and the main power and control pins retain their positions.
Where you need to be more careful is software.
Code written using common Pico SDK, MicroPython or Arduino abstractions may need little or no modification. Code that depends directly on RP2040 registers, PIO behavior, processor-specific instructions or other low-level hardware features may require changes for RP2350.
Electrically, you should also remember that RP2350 introduces capabilities that the original RP2040 did not have, including the newly qualified 5 V-tolerant digital GPIO behavior.
Bottom Line
The biggest surprise about the Raspberry Pi Pico vs Pico 2 pinout is how little changed physically.
Raspberry Pi kept the same board dimensions, the same 40-pin arrangement, the same exposed GPIO numbers, and the same locations for the main power, ADC and control connections.
Underneath those pins, however, the Pico 2 is a significantly different board.
Its RP2350 provides faster processors, more SRAM, twice the flash on the Pico 2 board, more PIO resources, new security features and updated GPIO capabilities.
So when upgrading an existing project, think of Pico 2 as largely a pin-compatible hardware upgrade, rather than a completely new pinout.
For individual pin functions and alternate peripheral assignments, use the interactive Raspberry Pi Pico 2 pinout on MicroPinouts.